WINTER HOLIDAY ALBUM


Francesca Orlandi
Ciao a tutti!
Sono Francesca, forse qualcuno mi conoscerà come @FraRigheEPois.
Abito a Treviglio in provincia di Bergamo, sono sposata con Andrea e sono mamma di due bellissimi ragazzi che mi riempiono la vita, Michele e Gabriele di 13 e 12 anni. Sono loro a sopportare il disordine creativo che regna in casa nostra!
Amo lo scrapbooking, l’acquerello e il mondo della creatività in generale... da che mi ricordi ho sempre pasticciato con carta e colori, i muri di casa dei miei genitori ne sanno qualcosa!
Credo che la creatività sia una meravigliosa abilità che va allenata e coltivata e che il talento sia sopravvalutato: con lo studio, la pratica e la passione tutti possono diventare creativi!
Sito WebHi!
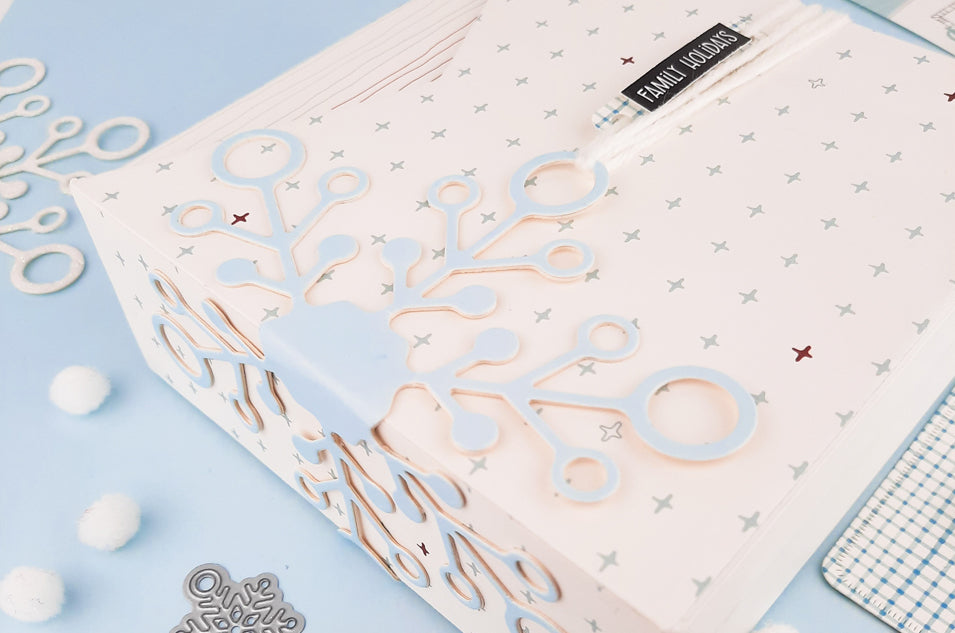
Today I share with you this album dedicated to the winter holidays on the snow, made with the “Good Cheer for Christmas” paper collection.
And also I used the new “Base for Mini Album 13x13”. The kit includes the ready-made structures of both the box and the album, I just coated them and inserted the pages! All super quick and easy! Now I'll explain how I did it.
BOX COVERING
First cover the two sides with the “V” cut and only then cover the lateral sides.
FACADES WITH "V" CUT - 2 pcs of patterned paper 13.5 (H) x 15.1 (W) cm - Fold at 0.9 only along the two heights (flaps to be folded and glued on the spine). Do not fold along the two long sides (from 15.1): on one of these you have to make the "V" cut, I suggest you trace the V shape with a pencil following the shape of the box itself and cut remaining slightly abundant 1 or 2 mm, once glued you can either turn them inside out or trim with the cutter. Glued.
LATERAL SIDE: 2 pcs of 13 (H) x 14.2 (W) cm patterned paper. Glue them.
ALBUM COVERING
First cover the two covers and only then cover the spine of the album.
COVERS: 2 pcs of 13 X 14.2 cm patterned paper - Fold at 0.9 along the 13 cm side, you will create the flap that you have to fold and glue on the spine of the album. The other 3 sides do not have this flap because they are glued flush with the edge of the cover
SPINE: 1 pc of 13 x 4.3 cm patterned paper or 1 pc of 13 x 6.3 cm with folds at 1 cm along both long sides to create flaps that you will simply glue towards the inside of the piece of paper, this just to better finish the edge. I also added decorative stitching.
PAGES
The binding is also simple, because the structure already has holes on the spine, so just puncture the inner pages and bind them with wool or cotton thread, you need 2 threads of about 40 cm each. Since there are 2 rows of holes, I have created two booklets. Each booklet is made up of 3 pieces of white cardboard which form the 6 pages.
The 3 cardboard will be folded and then inserted one inside the other, below are the measurements:
-1st cardboard (the outermost): 26.4 x 12.2 (H) cm - Folds on the long side at 12.4 and 14 cm
-2nd cardboard: 25.8 x 12.2 (H) cm - Folds on the long side at 12.4 and 13.4 cm
-3rd cardboard: 25.2 x 12.2 (H) cm - Folds on the long side at 12.4 and 12.8 cm
On each page you can add pockets in which to insert the tags and the "Dashing Squares" embellished with the "Tab Set" die.
Optional: I added two pieces of 12.2 (H) x 10cm cardstock to the center pages folded at 1cm along the 12.2cm side, this flap is attached to the page.
Remember to decorate and, if you like, stitch the pages before binding.
DECORATION
The protagonist of the decoration is the “Big Snowflake” die, a must have that alone, without too much effort, fills and embellishes any page. Here are the ways I used it:
- On the box I used it to tie the woolen thread around it using the circles present in the die.
- On a white cardboard (11.5x11.5) I punched only half of the snowflake without cutting it off completely, and I glued the Double-sided Pastel Blue paper on the back so that the blue can be seen, when the ribbon is lifted
- I only punched half or part of the Big Snowflake and glued it either on a pocket of "Vellum Foil Hexagons Holographics", or on the top edge of the page, using the bow circles to "tie and hang" the "Christmas Charms" .
- I cut a snowflake in half and glued it to the side edge of the page so as to slip other photo cards under it.
I'm sure you will find a thousand other ways to use this beautiful die!
To add some journaling I used the "Sentiment Strips Xmas Wishes".
I hope you enjoyed the project!
Thanks and good creativity!
Francesca.
I prodotti utilizzati:


Francesca Orlandi
Ciao a tutti!
Sono Francesca, forse qualcuno mi conoscerà come @FraRigheEPois.
Abito a Treviglio in provincia di Bergamo, sono sposata con Andrea e sono mamma di due bellissimi ragazzi che mi riempiono la vita, Michele e Gabriele di 13 e 12 anni. Sono loro a sopportare il disordine creativo che regna in casa nostra!
Amo lo scrapbooking, l’acquerello e il mondo della creatività in generale... da che mi ricordi ho sempre pasticciato con carta e colori, i muri di casa dei miei genitori ne sanno qualcosa!
Credo che la creatività sia una meravigliosa abilità che va allenata e coltivata e che il talento sia sopravvalutato: con lo studio, la pratica e la passione tutti possono diventare creativi!
Sito Web