REALLY CUTE BASKET


Marika Sinerchia
Mi chiamo Marika, sono sposata con Alessandro e sono mamma di due quadrupedi: uno di tg XXL e l' altra XXS Di giorno lavoro tra i colori e le tendenze della biancheria intima, dell' abbigliamento e delle calze e di notte mi immergo nei colori e nelle fantasie del cardmaking, scrapbooking, papercrafting... Amo questo mondo di condivisione, di continua sperimentazione, di studio, di ispirazione, di tecniche e di materiali ...e spero, attraverso i miei progetti, di poter trasmettere le infinite possibilità di interpretazione che questo mondo regala... Amore, impegno e professionalità saranno la mia parola d' ordine!
Sito WebHello everyone! As we all know, Mother’s Day is fast approaching so what a perfect occasion to thank our mum for everything she does for us!
The ModaScrap *Grazie* stamps set includes a number of sentiments that are simply perfect for this day:
- Thank you for everything you do and for who you are
- Thank you for making every day better
- Thank you for always being there
Or...
- Simply Thank you!
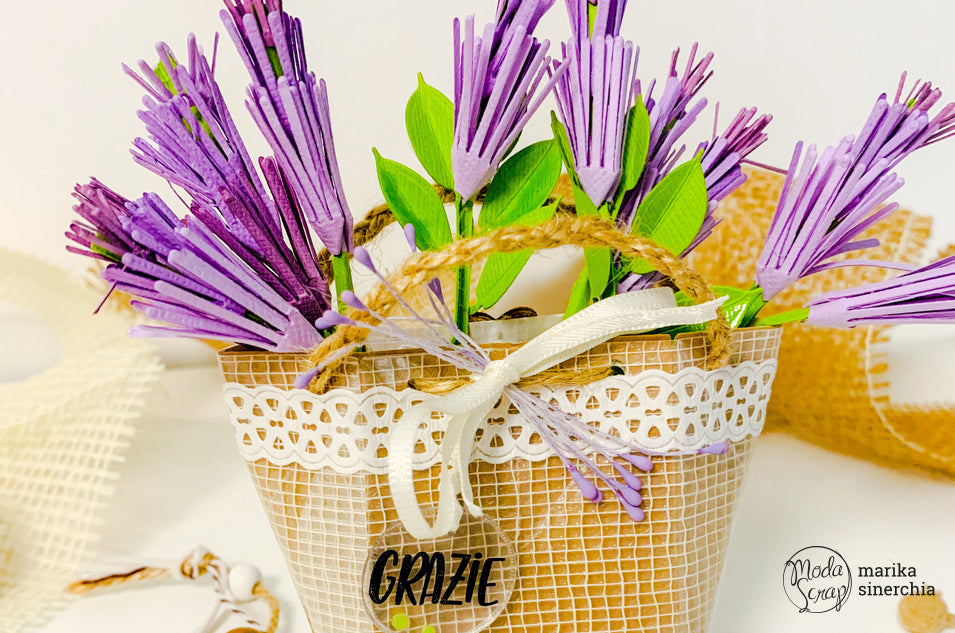
To make this lavender basket, I used 2 new special papers: the white gauze paper/kraft and the clear gauze paper. They are both very easy to die-cut or to fold when needed.
I die-cut both papers with the *Really Cute Box* die. To create the basket, I used the white/kraft paper (white for the inner side) and helped myself with some double-sided tape. I then covered it with the beautiful clear glauze paper.
I used a jute twine to create the handes. Again with my jute twine I closed the central area off by pulling it through the 2 front holes and tying them up in the back side. I used a wooden button to hide my knot.
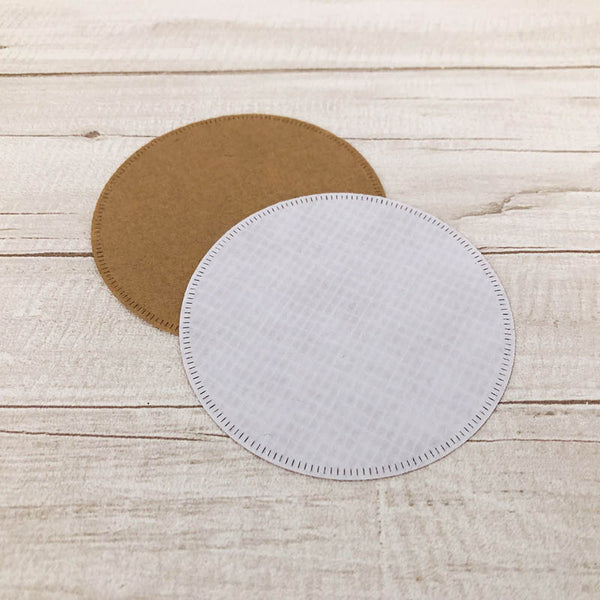
I embellished my basket with a lace washi tape, but you can also use a ribbon or some trim (the pom pom one is one of my favourite!). For the «Grazie» charm, I used some clear polishink. I die-cut the polishink with the *Dashing Circles* die (cicle n.6). I punched a «GRAZIE» with the STAZ ON and with a crop a dile I punched a hole in the upper side (The hole’s size shouldn’t be too small otherwise if you reduce it it might be too small).
Lastly, I punched the wording «For who you are» on the Modascrap vellum and I embossed it with a white powder. Now I am going to show you how I created my lavender.
First of all, I took my green paper and cut some little stripes (0.5cm wide). Using my *Dream Flower* die, I then die-cut 10 sunbursts for each of the 3 available sizes (meaning 10 large, 10 medium and 10 small ones), plus a number of leaves.
With my crop à dile I punched holes in the center of each sunburst. I folded my green stripe in the middle and glued the smallest sunburst on the top of it. I glued the second sunburst and made sure not to get too close to the first one.
Finally, I glued the 3° sunburst (the biggest one) again making sure not to get too close to the second one. At this point I cut the stems depending on my Really Cute basket’ssize, I added a few leaves at voilà. My lavender is ready!
I hope you enjoyed this project!
Happy crafting eveyone.
Kiss kiss.
Marika.
I prodotti utilizzati:

Marika Sinerchia
Mi chiamo Marika, sono sposata con Alessandro e sono mamma di due quadrupedi: uno di tg XXL e l' altra XXS Di giorno lavoro tra i colori e le tendenze della biancheria intima, dell' abbigliamento e delle calze e di notte mi immergo nei colori e nelle fantasie del cardmaking, scrapbooking, papercrafting... Amo questo mondo di condivisione, di continua sperimentazione, di studio, di ispirazione, di tecniche e di materiali ...e spero, attraverso i miei progetti, di poter trasmettere le infinite possibilità di interpretazione che questo mondo regala... Amore, impegno e professionalità saranno la mia parola d' ordine!
Sito Web