EASTER BASKET


Francesca Calabrese
Ciao, sono Francesca ma sul web mi trovate come AmyRose Lace:)
Da che ho ricordi, ho sempre armeggiato con qualcosa e la mia passione per il craft è cresciuta piano piano insieme a me. Sono alla ricerca continua di un equilibrio tra lavoro e famiglia, la creatività è diventata la mia valvola di sfogo, la mia ancora di salvezza nei momenti più bui. Creo per essere felice e per rendere felice le persone accanto a me. Come dico sempre alle mie figlie dobbiamo essere persone che escono fuori dal coro e non omologarsi a quello che gli altri vogliono, già siamo donne in un mondo maschilista e vogliamo anche con la creatività, portare un cambiamento, per il futuro di tutti noi.
Credo nel potere dell'unione e non della divisione, nell'aiutare le persone ad esprimersi, ad uscire dal guscio in cui sono, per poi poter volare e rendere il mondo un posto migliore. Perché anche noi possiamo fare qualcosa per cambiarlo.
Questa sono io, le mie ambizioni e la mia visione della vita: "life is better with a smile" e "ognuno di noi può fare qualcosa per rendere il mondo migliore" sono il mio motto!
Sito WebHello everyone and welcome back!
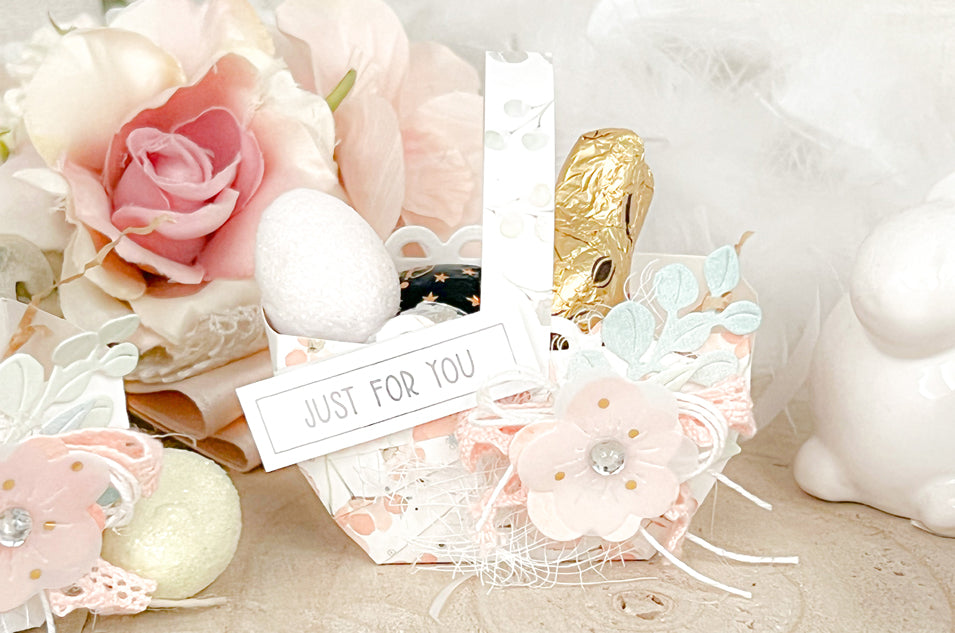
Spring is just around the corner and Easter is coming soon...so why don't you think of some quick gifts or place cards to make?
Today I'm going to show you how to use the new *spring basket* die cut to make a picnic basket to fill with chocolate eggs!
From the 6x6 *shades of love* paper pad, I chose three different patterns and cut out 12 x 13 cm rectangles.
I folded the sheet in half on the 12 cm side, then I took the *spring basket* die and placed the scalloped part flush with the sheet on the side where the two sheets fit together, so that when we go to die-cut, having the shorter sheet of the die we will be able to have a double continuous die-cut, so that once we open the sheet we will have double the spring basket die-cut. This should result in 13/14 marked lines (the die cuts lines every cm or so). Cut a separate one and then 12 all together.
Take the sheet and make folds at 3.8 cm on each side of the scallop, and every 4th line for the horizontal part. We should have a square divided into 9 quadrants (3 x 3), where the scallops are on the sides. We make lateral cuts on the horizontal lines for the 3.8 cm part only (4 in all). Now we will have the central vertical band joined and the sides cut. Imagine the square as a quadrant of 9 parts and in quadrants 1-3-7-9, we are going to make cuts on each marking line, they will be the radii of our basket.
We take the sheet with the scallops in front of us, we position the central part vertically and then in sequence left and right, one spoke at a time starting from the inner one, until the last one, overlapping the scallop part in the middle of the vertical part. Do this for the two sides and our basket will have taken shape! The only thing missing is the handle, which we will make using the previously cut strip! Now we can decorate it however we like! It's harder to explain than to do, but I'll leave you with a little demonstration video!
As always, I hope I've given you a few more ideas on how to use this die cut! Good creativity to all!
See you soon with other creations of the team!
Francesca.


Francesca Calabrese
Ciao, sono Francesca ma sul web mi trovate come AmyRose Lace:)
Da che ho ricordi, ho sempre armeggiato con qualcosa e la mia passione per il craft è cresciuta piano piano insieme a me. Sono alla ricerca continua di un equilibrio tra lavoro e famiglia, la creatività è diventata la mia valvola di sfogo, la mia ancora di salvezza nei momenti più bui. Creo per essere felice e per rendere felice le persone accanto a me. Come dico sempre alle mie figlie dobbiamo essere persone che escono fuori dal coro e non omologarsi a quello che gli altri vogliono, già siamo donne in un mondo maschilista e vogliamo anche con la creatività, portare un cambiamento, per il futuro di tutti noi.
Credo nel potere dell'unione e non della divisione, nell'aiutare le persone ad esprimersi, ad uscire dal guscio in cui sono, per poi poter volare e rendere il mondo un posto migliore. Perché anche noi possiamo fare qualcosa per cambiarlo.
Questa sono io, le mie ambizioni e la mia visione della vita: "life is better with a smile" e "ognuno di noi può fare qualcosa per rendere il mondo migliore" sono il mio motto!
Sito Web